This article provides all the information you need to understand and configure NAT on Cisco ASA, Cisco ASA-X , and Cisco Firepower Firewalls.
There are four possible methods of address translation, and each were defined in the Network Address Translation article series: Static NAT, Static PAT, Dynamic PAT, Dynamic NAT. This article assumes prior knowledge of each of these concepts. If you need a refresher, please check out the article series.
Cisco ASA NAT – Contents:
Part 1 – NAT Syntax
There are two sets of syntax available for configuring address translation on a Cisco ASA. These two methods are referred to as Auto NAT and Manual NAT. The syntax for both makes use of a construct known as an object. The configuration of objects involve the keywords real and mapped. In Part 1 of this article we will discuss all five of these terms.
Objects
An object is a construct which represents any single item in your network environment. Two types of objects can be configured:
- a network object — represents one IP address, or one IP Subnet, or one IP address range
- a service object — represents one set of a Protocol, Source Port, and/or Destination port
The idea is to configure and define an object, then reference that one item in your configuration by the object’s name.
Network Objects
To configure a network object, first use the following syntax to create the object:
object network <Object Name>
Then define the content of the object as either a single IP Address, or a single IP Subnet, or a single IP Address range using either of the commands below:
host <IP Address>
subnet <Network ID> <Subnet Mask>
range <Start IP Address> <End IP Address>
Below are examples of each of the three types of network objects:
To create a network object which represents your web server’s IP address, you would use the following syntax:
object network WEB-SERVER
  host 172.16.30.15
To create a network object which represents your Inside network, you would use the following syntax:
object network INSIDE-NETWORK
  subnet 172.16.30.0 255.255.255.0
Lastly, to create a network object which represents a particular IP address range, you would use the following syntax. This will define a range that includes all five IP addresses in the inclusive range of 72.6.6.10 through 72.6.6.14.
object network PUBLIC-IPs
  range 72.6.6.10 72.6.6.14
Service Objects
To configure a service object, first use the following syntax to create the object:
object service <Object Name>
The content of the service object must include at least a protocol, and can also include a source port, destination port, or both. Here are examples of all four possibilities:
object service PROTOCOL
  service esp

object service PROT-DST
  service tcp destination eq 80

object service PROT-SRC
  service tcp source gt 1023

object service PROT-SRC-DST
  service udp source eq 53 destination eq 53
The specific port number the object represents can be identified using certain operators – the example above uses eq and gt. Five different operators exists:
eq <Port#> |
Port must be equal to <Port#> |
gt <Port#> |
Port must be greater than <Port#> (equal to <Port#> will not match) |
lt <Port#> |
Port must be lesser than <Port#> (equal to <Port#> will not match) |
neq <Port#> |
Port must be not equal to <Port#> |
range <Start#> <End#> |
Port must be in the inclusive range of <Start#> to <End#> |
Viewing Objects
Two commands are available to view objects:
The show run object command lists the objects essentially as they were configured above:
asa98#  show run object
object service PROTOCOL
  service esp
object service PROT-DST
  service tcp destination eq www
object service PROT-SRC
  service tcp source gt 1023
object service PROT-SRC-DST
  service udp source eq domain destination eq domain
object network WEB-SERVER
  host 172.16.30.15
object network INSIDE-NETWORK
  subnet 172.16.30.0 255.255.255.0
object network PUBLIC-IPs
  range 72.6.6.10 72.6.6.14
And the show run object in-line command displays the same as above, except every object definition will be on the same line as the object name:
asa98#  show run object in-line
object service PROTOCOL service esp
object service PROT-DST service tcp destination eq www
object service PROT-SRC service tcp source gt 1023
object service PROT-SRC-DST service udp source eq domain destination eq domain
object network WEB-SERVER host 172.16.30.15
object network INSIDE-NETWORK subnet 172.16.30.0 255.255.255.0
object network PUBLIC-IPs range 72.6.6.10 72.6.6.14
Using the in-line variant makes it much easier to “pipe include” and search for a specific object name and/or definition:
asa98#  show run object in-line | include WEB
object network WEB-SERVER host 172.16.30.15
If you had done the “pipe include” without the in-line option you just would have received the full name of the object, but not the object’s definition.
Real and Mapped
NAT configuration on the Cisco ASA will make use of the keywords real and mapped. These terms can be applied to IP addresses or interfaces. We will define these with the example of a Static NAT below:
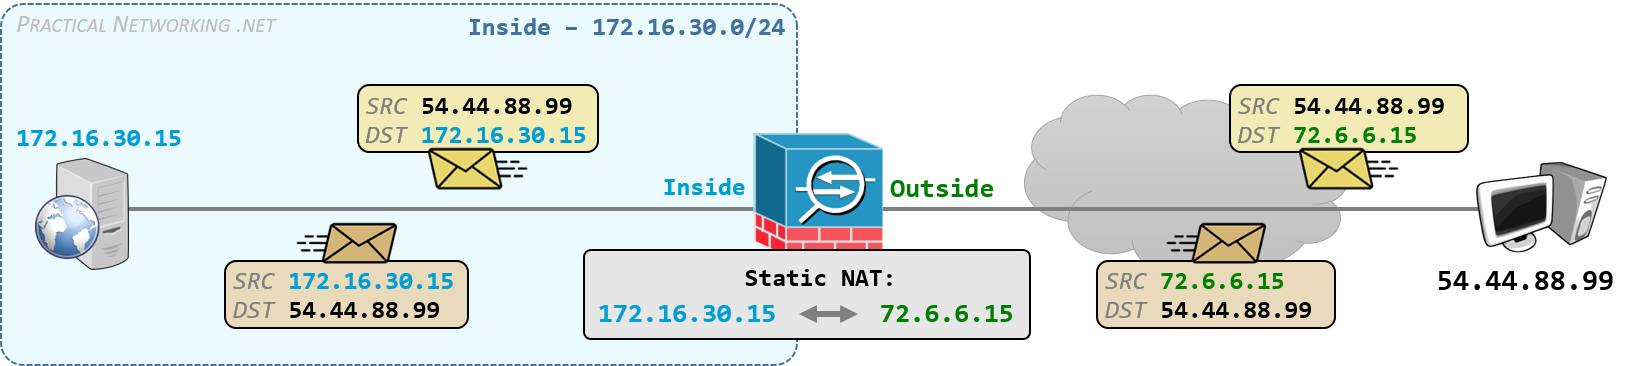
The word real indicates what is really configured on a server.
For example, the web server at the IP address .15 is really configured with the IP address 172.16.30.15, which means the actual NIC really has the IP address 172.16.30.15 configured. Hence, 172.16.30.15 is considered the real IP address.
Moreover, the real IP exists on the ASA’s Inside interface. Hence, for the translation above, the Inside interface is considered the real interface.
The word mapped indicates attributes after a translation has occurred.
For example, the real address 172.16.30.15 is being translated to 72.6.6.15. Which makes 72.6.6.15 the mapped address. Moreover, the mapped address exists on the ASA’s Outside interface. Hence the Outside interface is considered the mapped interface.
Another way to remember it is the mapped attributes only exist because the ASA created them, whereas the real attributes exist despite any configuration on the ASA.
Auto NAT
We discussed the configuration of Objects because Auto NAT is configured within the Object definition, and we discussed the keywords Real and Mapped because the syntax uses these terms to designate the addresses involved in the translation.
With those items defined, we can finally discuss the definition and syntax of Auto NAT.
Auto NAT can be used anytime you need to make a NAT decision based upon only the Source of traffic. Which means each of the four types of translations (Static NAT, Static PAT, Dynamic PAT, Dynamic NAT) can be configured with Auto NAT.
Auto NAT Syntax
This is the syntax for Auto NAT is as follows (remember, this will be applied within the object definition):
nat (<REAL-INTERFACE>,<MAPPED-INTERFACE>) <static|dynamic> <MAPPED-IP>
nat |
The configuration for Auto NAT starts with the nat command within an object definition |
<REAL-INTERFACE> |
The interface on the ASA which faces the the <real-ip> (defined within the object) |
<MAPPED-INTERFACE> |
The interface on the ASA which faces the <mapped-ip> |
<static|dynamic> |
Use static for Static NAT or Static PAT, use dynamic for Dynamic NAT or Dynamic PAT |
<MAPPED-IP> |
The IP address to which the object is being translated. This can be specified as an IP address directly or using the name of another object. You also have the option of specifying the interface keyword to use the IP address assigned to the mapped-interface |
Notice the elements of the syntax did not include specifying a <real-ip> – it is inherited from the object’s definition. Consequently, Auto NAT can only be configured directly within an object.
This is a complete example configuration of a Static NAT for the Web server from the image above. The real-IP 172.16.30.15 is being translated to the mapped-IP 72.6.6.15 when packets are traveling between the real-interface inside and the mapped-interface outside (and vice versa).
object network WEB-SERVER
  host 172.16.30.15
  nat (inside,outside) static 72.6.6.15
This is a complete example configuration of a Dynamic PAT for the Inside segment from the image above. The real-ip addresses in the 172.16.30.0/24 network are sharing the IP address of the mapped-interface outside.
object network INSIDE-NETWORK
  subnet 172.16.30.0 255.255.255.0
  nat (inside,outside) dynamic interface
Auto NAT with a Port Translation
The syntax above did not include the arguments necessary to allow you to map one port to another – namely, to configure a Static PAT.
In order to translate ports, you must add the service section to the end of your AutoNAT command. Giving us an updated syntax as follows (again, this is configured within an object):
nat (<REAL-INTF>, <MAPPED-INTF>) static <MAPPED-IP> [service <tcp|udp> <REAL-PORT> <MAPPED-PORT>]
service |
indicates a translation of port numbers |
<tcp|udp> |
specifying whether this translation affects TCP or UDP ports |
<REAL-PORT> |
identifies the port number associated with the real IP address |
<MAPPED-PORT> |
designates the port number associated with the mapped IP address |
There is no such thing as a “dynamic” explicit translation between ports, so a Static PAT translation will always use the static designation.
This is a complete example configuration of a Static PAT for the Web Server. The Web Server’s SSH port (TCP/22) is being hidden behind a non-standard port on the Outside (TCP/2222):
object network WEB-SERVER-SSH
  host 172.16.30.15
  nat (inside,outside) static 72.6.6.15 service tcp 22 2222
Notice, we had to create a new object – each object can only contain one translation, and we were already using the object WEB-SERVER for the Static NAT example above.
Manual NAT
There are two primary differences between Manual NAT and Auto NAT:
- Auto NAT can only make a NAT decision based upon the Source* of traffic.
- Auto NAT can only translate the Source* of traffic.
- Manual NAT can make a NAT decision based upon the Source, or upon both the Source and Destination.
- Manual NAT can translate the Source, the Destination, or even both the Source and Destination at the same time.
In short, Manual NAT can do everything that Auto NAT can, and a little extra – namely, Policy NAT and Twice NAT.
Of course, this doesn’t make Auto NAT obsolete. Instead, the “much simpler to configure” Auto NAT should be used whenever the additional features of Manual NAT are not needed.
Moreover, Auto NAT statements automatically sort themselves into a (generally) sensible order. Whereas the ordering of Manual NAT statements has to be manually considered. The details of this NAT precedence implication will be discussed later in this article.
The syntax of Manual NAT requires using objects for every reference to IP addresses and Ports. The configuration of objects was covered earlier in this article. You may also use object-groups, which are constructs that combine multiple objects together.
Manual NAT Syntax – Source Only
The syntax for Manual NAT statements which only affects the Source of traffic is as follows. Note that every term in italics below is the name of an Object which identifies a particular IP or set of IP Addresses:
nat (<REAL-INTF>,<MAPPED-INTF>) source <static|dynamic> <REAL-SRC> <MAPPED-SRC>
The syntax is similar to Auto NAT, except for a key difference: Manual NAT is not configured within an Object — it is configured directly from global configuration mode (aka, configure terminal).
This is the definition of each argument in the Manual NAT syntax:
nat |
All manual NAT statements start with the command nat |
<REAL-INTF> |
The interface which faces the addresses contained in the object <REAL-SRC> |
<MAPPED-INTF> |
The interface which faces the addresses contained in the object <MAPPED-SRC> |
source |
Indicating the next three arguments are matching and translating the source of outbound traffic |
<static|dynamic> |
Use static for Static NAT or Static PAT, use dynamic for Dynamic NAT or Dynamic PAT |
<REAL-SRC> |
An object which defines the pre-translation IP Address(es) |
<MAPPED-SRC> |
An object which defines the post-translation IP Address(es) |
The examples above of a Static NAT and Dynamic PAT with AutoNAT can be re-written using Manual NAT as follows:
object network WEB-SERVER
  host 172.16.30.15

object network WEB-SERVER_PUBLIC
  host 72.6.6.15

nat (inside,outside) source static WEB-SERVER WEB-SERVER_PUBLIC
object network INSIDE-NETWORK
  subnet 172.16.30.0 255.255.255.0

nat (inside,outside) source dynamic INSIDE-NETWORK interface
Note that the Manual NAT statement is configured external of the Object definition. In addition, note that you can still use the interface keyword to designate using the IP address of the <MAPPED-INTF> for the <MAPPED-SRC>.
The Manual NAT statement above is the simplest form of the Manual NAT syntax. Later, we will add two more clauses to this statement: a clause that considers the destination and a clause that considers ports.
However, first we must understand how to read the Manual NAT statement in its simplest form. Use this technique to turn Manual NAT syntax into more human-readable language.

Every variation of the Manual NAT statement that follows will start with the exact syntax above. In each case, we will also expand the “how to read” section to simplify understanding what is being translated and how it is being translated.
Manual NAT Syntax – Source and Destination
The syntax for Manual NAT that considers both the Source and Destination of traffic is as follows:
nat (<REAL-INTF>,<MAPPED-INTF>) source <static|dynamic> <REAL-SRC> <MAPPED-SRC> destination static <REAL-DST> <MAPPED-DST>
You’ll notice the syntax is identical to “source-only” Manual NAT in the preceding section. The only addition is this part at the end:
... destination static <REAL-DST> <MAPPED-DST>
destination |
Indicates the next three arguments are matching and/or translating the Destination of outbound traffic |
static |
The destination of outbound traffic can only be translated explicitly – dynamic is not an option |
<REAL-DST> |
An object which defines the pre-translation destination IP Address(es) |
<MAPPED-DST> |
An object which defines the post-translation destination IP address(es) |
Later in this article, we will provide use cases for Manual NAT statements that include both the Source and the Destination. For now, we just want to thoroughly define the syntax and how to interpret Manual NAT statements.
We can extend the technique in the previous section which makes Manual NAT syntax more human-readable.

Notice, the translation will only occur if the traffic matches both the Source and Destination designated in the objects <REAL-SRC> and <REAL-DST>.
Manual NAT Syntax – Port Translations
The syntax for Manual NAT that involves translating TCP or UDP ports as well as IP Addresses is as follows:
nat (<REAL-INTF>,<MAPPED-INTF>)
  source <static|dynamic> <REAL-SRC> <MAPPED-SRC>
    [destination static <REAL-DST> <MAPPED-DST>]
      service <REAL-PORT> <MAPPED-PORT>
This command is configured on one line. But for the sake of simplicity, we will present the same syntax with each clause on its own line:
nat (<REAL-INTF>,<MAPPED-INTF>)
source <static|dynamic> <REAL-SRC> <MAPPED-SRC>
[destination static <REAL-DST> <MAPPED-DST>]
service <REAL-PORT> <MAPPED-PORT>
You’ll notice the syntax is identical to “source and destination” Manual NAT in the preceding section. The only differences are that the destination clause is optional and the service clause is appended to the end:
... service <REAL-PORT> <MAPPED-PORT>
service |
Indicates this translation will also translate ports, i.e. this will be a PAT |
<REAL-PORT> |
A service object which defines the pre-translation ports and protocols |
<MAPPED-PORT> |
A service object which defines the post-translation ports and protocols |
Earlier we provided an example of a Static PAT using Auto NAT. We can create an identical translation using Manual NAT with the following code:
object network WEB-SERVER
  host 172.16.30.15

object network WEB-SERVER_PUBLIC
  host 72.6.6.15

object service TCP22
  service tcp source eq ssh

object service TCP2222
  service tcp source eq 2222

nat (inside,outside) source static WEB-SERVER WEB-SERVER_PUBLIC service TCP22 TCP2222
Recall, every reference to IP addresses or Ports in a Manual NAT statement must use an object.
Moreover, note that the service objects were defined specifying a source port. NAT statements are written from the perspective of outbound traffic (traveling from inside to outside).
In our Static PAT example, our goal was to translate destination port TCP/2222 on the outside to TCP/22 on the inside for inbound traffic. In the outbound packet the source port will change from TCP/22 to TCP/2222. Our NAT statement above simply matches the response traffic.
As before, we will extend the human-readable Manual NAT technique to include the service section (again, the command is all on one line, but each clause is listed on its own line below for simplicity):

Again, traffic will only be translated if all three designations of the real attributes match: <REAL-SRC>, <REAL-DST>, and <REAL-PORT>.
The infographic above represents the complete Manual NAT syntax and might make a handy cheat sheet or print out to simplify the configuration and interpretation of Manual NAT statements.
Part 2 – NAT Configuration Examples
In Part 1 of this article series, we discussed the syntax and use cases for Auto NAT and Manual NAT. In this section we will provide configuration examples for every type of address translation using both Auto NAT and Manual NAT on a Cisco ASA or Cisco ASAx Firewall.
In addition to the configuration commands, we will also list the output of the show nat, show run nat, and show run object commands for each entry below.
translation and un-translation counters will be zero. To simplify the output, these lines have been omitted.Static NAT
A Static NAT is a translation in which only the IP addresses are being modified, and the mapping between pre-translation and post-translation IP addresses is explicitly defined.
This is the illustration of a Static NAT from the NAT article series:

Static NAT can be configured using Auto NAT or Manual NAT.
Static NAT with Auto NAT
object network WEB33
  host 10.2.2.33
  nat (inside,outside) static 73.8.2.33
asa98# show nat
Auto NAT Policies (Section 2)
1 (inside) to (outside) source static WEB33 73.8.2.33
asa98# show run nat
!
object network WEB33
 nat (inside,outside) static 73.8.2.33
asa98# show run object
object network WEB33
 host 10.2.2.33
Static NAT with Manual NAT
object network WEB33
  host 10.2.2.33

object network WEB33-Public
  host 73.8.2.33

nat (inside,outside) source static WEB33 WEB33-Public
asa98# show nat
Manual NAT Policies (Section 1)
1 (inside) to (outside) source static WEB33 WEB33-Public
asa98# show run nat
nat (inside,outside) source static WEB33 WEB33-Public
asa98# show run object
object network WEB33
 host 10.2.2.33
object network WEB33-Public
 host 73.8.2.33
The choice between using Auto NAT or Manual NAT to configure Static NAT has to do with NAT order of operations – this will be discussed in the NAT Precedence section.
Static PAT
A Static PAT is a translation in which the IP Addresses and Port numbers are being modified, and the mapping between pre-translation and post-translation attributes is explicitly defined.
This is the illustration of a Static PAT from the NAT article series. Click the tabs to view the Inbound or Outbound flow:


Static PAT with Auto NAT
object network WEB41-www
  host 10.4.4.41
  nat (inside,outside) static 73.8.2.44 service tcp 8080 80

object network WEB42-https
  host 10.4.4.42
  nat (inside,outside) static 73.8.2.44 service tcp 443 443
asa98# show nat
Auto NAT Policies (Section 2)
1 (inside) to (outside) source static WEB41-www 73.8.2.44 service tcp 8080 www
2 (inside) to (outside) source static WEB42-https 73.8.2.44 service tcp https https
asa98# show run nat
object network WEB41-www
 nat (inside,outside) static 73.8.2.44 service tcp 8080 www
object network WEB42-https
 nat (inside,outside) static 73.8.2.44 service tcp https https
asa98# show run object
object network WEB41-www
 host 10.4.4.41
object network WEB42-https
 host 10.4.4.42
Static PAT with Manual NAT
object network WEB41
  host 10.4.4.41

object network WEB42
  host 10.4.4.42

object network PUBLIC-WEB
  host 73.8.2.44

object service TCP8080
  service tcp source eq 8080

object service TCP80
  service tcp source eq 80

object service TCP443
  service tcp source eq 443

nat (inside,outside) source static WEB41 PUBLIC-WEB service TCP8080 TCP80
nat (inside,outside) source static WEB42 PUBLIC-WEB service TCP443 TCP443
Notice, for the second translation we are reusing the object TCP443 to indicate a translation to the same port — in essence, not translating the port, but still creating a “channel” through 73.8.2.44 on port 443.
asa98# show nat
Manual NAT Policies (Section 1)
1 (inside) to (outside) source static WEB41 PUBLIC-WEB service TCP8080 TCP80
2 (inside) to (outside) source static WEB42 PUBLIC-WEB service TCP443 TCP443
asa98# show run nat
nat (inside,outside) source static WEB41 PUBLIC-WEB service TCP8080 TCP80
nat (inside,outside) source static WEB42 PUBLIC-WEB service TCP443 TCP443
asa98# show run object
object network WEB41
 host 10.4.4.41
object network WEB42
 host 10.4.4.42
object network PUBLIC-WEB
 host 73.8.2.44
object service TCP8080
 service tcp source eq 8080
object service TCP80
 service tcp source eq www
object service TCP443
 service tcp source eq https
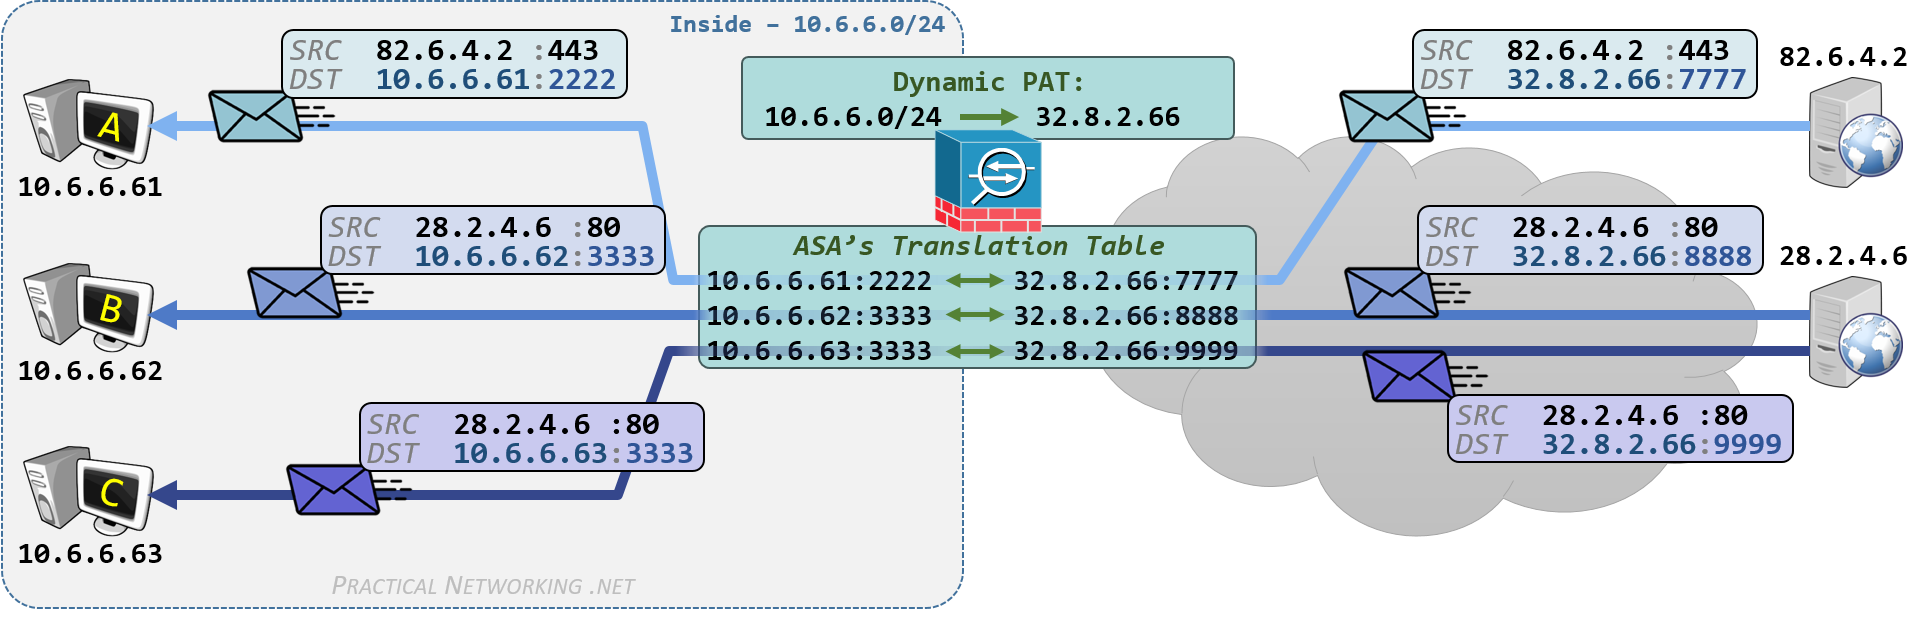
Dynamic PAT
A Dynamic PAT is a translation in which the IP addresses and Port numbers are being modified, and the mapping between pre-translation and post-translation attributes is dynamically determined by the Firewall.
Said another way, a Dynamic PAT allows multiple internal hosts with Private IP addresses to share one (or more) Public IP addresses.
This is the illustration of a Dynamic PAT from the NAT article series. Click the tabs to view the Outbound or Inbound flow.

Dynamic PAT with Auto NAT
object network INSIDE66
  subnet 10.6.6.0 255.255.255.0
  nat (inside,outside) dynamic 32.8.2.66
asa98# show nat
Auto NAT Policies (Section 2)
1 (inside) to (outside) source dynamic INSIDE66 32.8.2.66
asa98# show run nat
object network INSIDE66
 nat (inside,outside) dynamic 32.8.2.66
asa98# show run object
object network INSIDE66
 subnet 10.6.6.0 255.255.255.0
Dynamic PAT with Manual NAT
object network INSIDE66
  subnet 10.6.6.0 255.255.255.0

object network DPAT-IP
  host 32.8.2.66

nat (inside,outside) source dynamic INSIDE66 DPAT-IP
asa98# show nat
Manual NAT Policies (Section 1)
1 (inside) to (outside) source dynamic INSIDE66 DPAT-IP
asa98# show run nat
nat (inside,outside) source dynamic INSIDE66 DPAT-IP
asa98# show run object
object network INSIDE66
 subnet 10.6.6.0 255.255.255.0
object network DPAT-IP
 host 32.8.2.66
The choice between using Auto NAT or Manual NAT to configure Dynamic PAT has to do with NAT order of operations – we will discuss this in the NAT Precedence section.
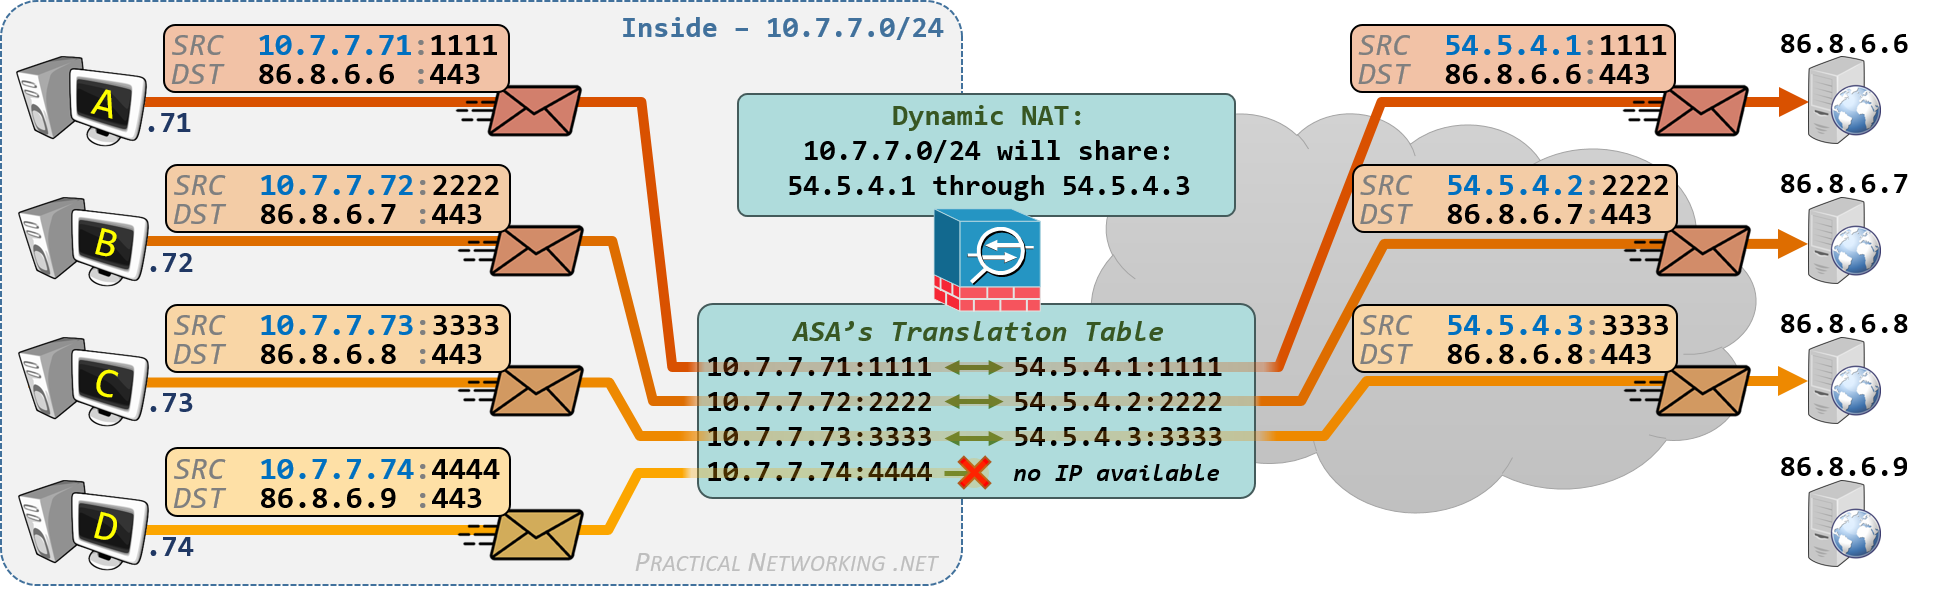
Dynamic NAT
A Dynamic NAT is a translation in which only the IP addresses are being modified, and the mapping between pre-translation and post-translation IP addresses is dynamically determined by the Firewall.
Said another way, a Dynamic NAT allows multiple internal hosts with Private IP addresses to temporarily own a dedicated Public IP address so long as they have an active session.
This is the illustration of the Dynamic NAT from the NAT article series:
Dynamic NAT with Auto NAT
object network DNAT-RANGE
  range 54.5.4.1 54.5.4.3

object network INSIDE77
  subnet 10.7.7.0 255.255.255.0
  nat (inside,outside) dynamic DNAT-RANGE
asa98# show nat
Auto NAT Policies (Section 2)
1 (inside) to (outside) source dynamic INSIDE77 DNAT-RANGE
asa98# show run nat
object network INSIDE77
 nat (inside,outside) dynamic DNAT-RANGE
asa98# show run object
object network INSIDE77
 subnet 10.7.7.0 255.255.255.0
object network DNAT-RANGE
 range 54.5.4.1 54.5.4.3
Looking at the configuration above, it might appear to be identical to the Dynamic PAT configuration in the preceding section. There is, however, a key difference:
To configure a Dynamic NAT, you must designate the mapped-IP address using an object defined with a range of addresses. If you use an IP address directly, or an object defined with host or subnet, the ASA will perform a Dynamic PAT.
You also have the option to configure the Dynamic NAT as you did above, while designating that all remaining hosts can share an interface IP address – this is known as configuring a fallback IP address.
To configure the Interface IP as a fallback, simply append the argument interface to the Dynamic NAT command:
object network INSIDE77
  nat (inside,outside) dynamic DNAT-RANGE interface
Dynamic NAT with Manual NAT
object network DNAT-RANGE
  range 54.5.4.1 54.5.4.3

object network INSIDE77
  subnet 10.7.7.0 255.255.255.0

nat (inside,outside) source dynamic INSIDE77 DNAT-RANGE
asa98# show nat
Manual NAT Policies (Section 1)
1 (inside) to (outside) source dynamic INSIDE77 DNAT-RANGE
asa98# show run nat
nat (inside,outside) source dynamic INSIDE77 DNAT-RANGE
asa98# show run object
object network DNAT-RANGE
 range 54.5.4.1 54.5.4.3
object network INSIDE77
 subnet 10.7.7.0 255.255.255.0
Just like in the preceding Auto NAT configuration, the fact that the mapped-IP is a network object defined with a range makes this a Dynamic NAT (instead of a Dynamic PAT).
The same option exists to use the Interface IP of the Mapped interface as the Dynamic PAT fallback option:
nat (inside,outside) source dynamic INSIDE77 DNAT-RANGE interface
The choice between using Auto NAT or Manual NAT to configure Dynamic NAT has to do with NAT order of operations – this will be discussed in the NAT Precedence section.
Part 3 – Advanced NAT
In Part 1, we explored the syntax of configuring Objects, the terms Real and Mapped, the syntax of Auto NAT, and the syntax of Manual NAT.
In Part 2, we provided configuration examples on a Cisco ASA firewall for each type of address translation: Static NAT, Static PAT, Dynamic PAT, Dynamic NAT.
In Part 3, we will continue our exploration of Network Address Translation on a Cisco ASA or Cisco ASA-X Firewall by looking at some advanced concepts.
Namely, we will define and look at configuration examples for Policy NAT and Twice NAT, then discuss the concept of Identity NAT, and finally explain the NAT order of operation on a Cisco ASA or Cisco ASA-X Firewall.
Policy NAT
Each of the four types of translations we illustrated above involved making a NAT decision based upon only matching the source of incoming traffic. This causes all traffic from a particular source to be translated the same way.
There are times when it might be beneficial to conditionally translate traffic based upon its destination. In those cases, you are performing what is known as a Policy NAT.
A Policy NAT is any of the four types of address translation we have already discussed (Static NAT, Static PAT, Dynamic PAT, Dynamic NAT), except the translation decision is based upon both the Source and the Destination.
To configure a Policy NAT on a Cisco ASA, you would use the Manual NAT syntax which includes the Source and Destination clauses. A Policy NAT cannot be configured using Auto NAT syntax — Auto NAT only considers the Source.
We will provide a Policy NAT configuration example using the following scenario:

The configuration in the illustration above involves two parts: A Policy Dynamic PAT and a regular Dynamic PAT. The regular Dynamic PAT is the same one that we showed in the Dynamic PAT example above – those commands have already been provided and won’t be repeated below.
The commands for the Policy Dynamic PAT are as follows:
object network INSIDE66
  subnet 10.6.6.0 255.255.255.0

object network HOST45
  host 45.5.4.9

object network PDPAT-HOST45
  host 32.8.2.77

nat (inside,outside) source dynamic INSIDE66 PDPAT-HOST45 destination static HOST45 HOST45
If we apply what we learned in the human-readable technique for Manual NAT statement to the commands above, we can infer exactly what is happening:

Essentially, the source is being dynamically translated from INSIDE66 to PDPAT-HOST45, and the destination is being statically translated from HOST45 to HOST45 as the traffic traverses from inside to outside.
In all cases, the real attributes are being translated to their mapped counterparts.
The destination is being translated to itself – in other words, not being translated. We’ll expand on this type of “translation” later in this article.
The effect of the configuration above makes it so when the Inside network (10.6.6.0/24) is speaking to the IP 45.5.4.9, the traffic will be translated using Dynamic PAT to 32.8.2.77. If the traffic from the Inside network is not going to the 45.5.4.9 IP address, the regular Dynamic PAT configuration would continue to translate the packet to 32.8.2.66.
Note, since the above configuration involves two separate configuration items that work together, we must consider the order in which the NAT statements are processed. We will explore these considerations in the NAT Precedence section that follows.
Twice NAT
The Policy NAT in the preceding section provided an example of translating the source, based upon matching the source and destination. Note that only the source was translated.
There are times when it is beneficial to translate both the source and destination – in those cases you would use what is called a Twice NAT – i.e, performing NAT two times: once on the source and once on the destination.
The configuration for a Twice NAT is very similar to the Policy NAT above. We will use the scenario below:
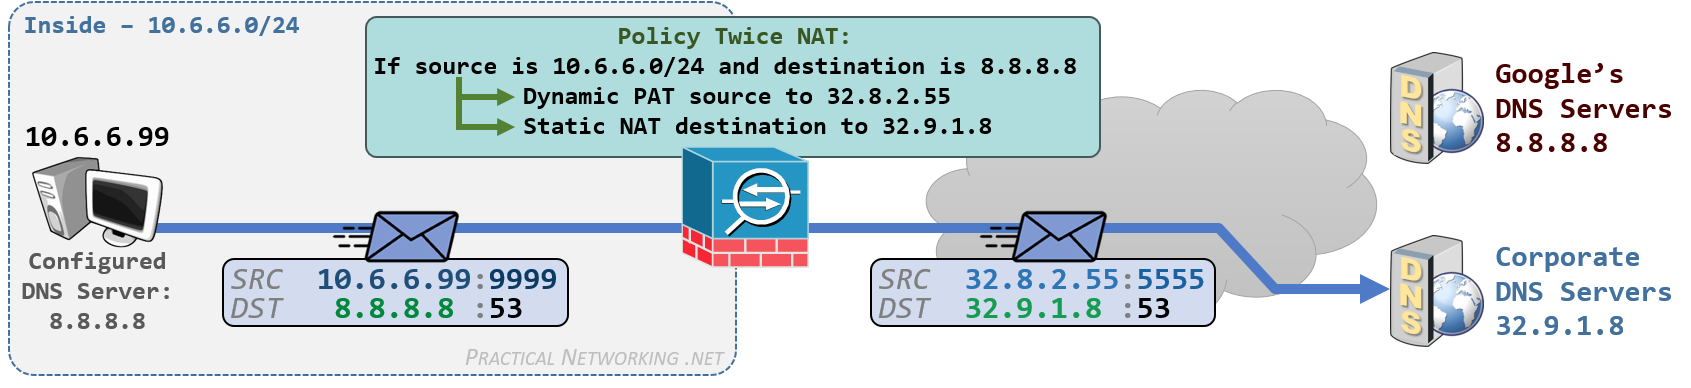
The scenario for the image above is explained in the Twice NAT article from which it was taken:
10.6.6.0/24) that have chosen to use Google’s Public DNS Resolving Server (8.8.8.8). However, company policy states DNS requests must be made using the Corporate DNS server (32.9.1.8). One option is … to translate any outbound requests to 8.8.8.8 into a request for 32.9.1.8.Notice the configuration of a Twice NAT also involves a Policy NAT. The Policy NAT portion will match DNS traffic from the Inside network destined to 8.8.8.8, and the Twice NAT portion will translate the source using Dynamic PAT and the destination using Static NAT.
Since we only want this rule to match on DNS traffic, we will use the syntax of Manual NAT which includes the service section.
object network INSIDE66
  subnet 10.6.6.0 255.255.255.0

object network DPAT-IP-DNS
  host 32.8.2.55

object network GOOGLE-DNS
  host 8.8.8.8

object network CORP-DNS
  host 32.9.1.8

object service UDP53
  service udp destination eq 53

nat (inside,outside) source dynamic INSIDE66 DPAT-IP-DNS destination static GOOGLE-DNS CORP-DNS service UDP53 UDP53
Notice the service object definition uses destination UDP/53 in this case. DNS traffic leaving the Inside network will have a protocol of UDP and a destination port of 53 – this is the outbound traffic we are intending to match.
We can apply our technique to make the Manual NAT statement human-readable to easily interpret what is occurring:
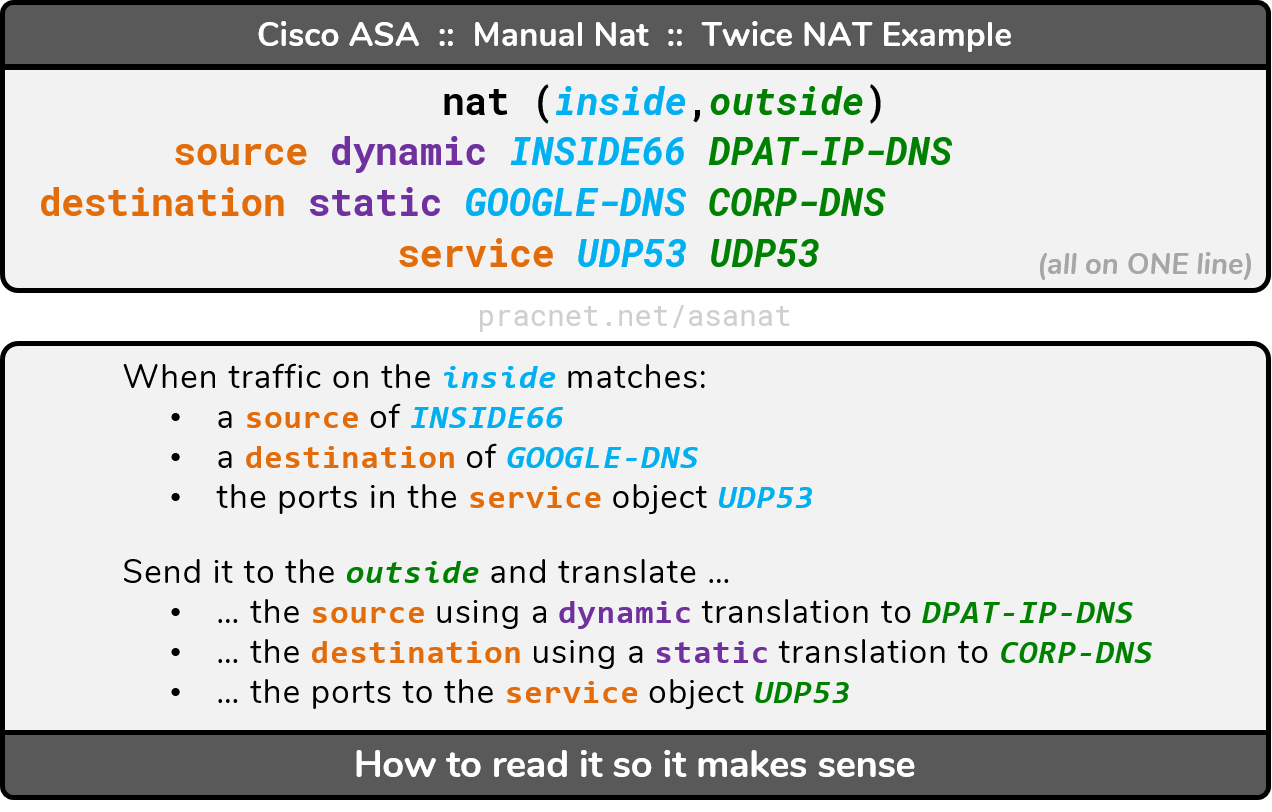
Essentially, the source is being dynamically translated from INSIDE66 to DPAT-IP-DNS, and the destination is being statically translated from GOOGLE-DNS to CORP-DNS if the traffic matches the ports specified by UDP53, which will also be “translated” to UDP53.
In all cases, the real attributes are being translated to their mapped counterparts. The order of the items in the manual NAT statement remains constant: Always real, then mapped.
To summarize four different concepts are collaborating in the illustration and configuration example above:
- We are making a decision based upon the source and destination, which makes it a Policy NAT.
- Both the source and destination of traffic are being translated — this is, by definition, a Twice NAT.
- The source is being translated with a Dynamic PAT
- The destination is being translated with a Static NAT.
NAT Precedence
The ASA processes address translation statements in a very specific order. You must understand this order, along with the configuration syntax outlined above, to truly become a master of address translation on the Cisco ASA and Cisco ASA-X Firewalls.
The core of how it works is as follows:
Every Manual NAT statement takes precedence over every Auto NAT statement. However, there is a way to de-prioritize specific Manual NAT statements to occur after the Auto NAT statements.
This creates three sections that all NAT statements fall into – which constitute the NAT order of operation:
- Section 1: All Manual NAT Statements
- Section 2: All Auto NAT Statements
- Section 3: All Manual NAT Statements de-prioritized to occur after Auto-NAT
You may have seen Section 1 and Section 2 in the output from the show nat command above.
The idea behind the three sections is that since Manual NAT statements have the option of making decisions on Source and Destination, they tend to be more specific than Auto NATs (which can only make a decision based on source). As a result, Manual NAT statements should have higher priority than Auto NAT statements.
However, there might be times when you want to use a Manual NAT statement for a generic translation (maybe one that only makes a decision on the Source), but have it apply after more specific Auto NAT statements.
We will illustrate this using the same image we used for Policy NAT earlier, but we will add two additional Static NAT translations for Host A and Host B (these translations are not depicted on the image):
First, let’s create all the objects we will need:
object network INSIDE66
  subnet 10.6.6.0 255.255.255.0

object network HOST45
  host 45.5.4.9

object network PDPAT-HOST45
  host 32.8.2.77

object network HOST-A
  host 10.6.6.61

object network HOST-B
  host 10.6.6.62

object network DPAT-IP
  host 32.8.2.66
Then we will create four translation statements using the newly created objects:
- A Policy NAT so traffic from the Inside to
45.5.4.9will be translated using Dynamic PAT to32.8.2.77 - A Static NAT for Host A to translate
10.6.6.61to32.8.2.61 - A Static NAT for Host B to translate
10.6.6.62to32.8.2.62 - A Dynamic PAT for the remaining traffic from the Inside network using Manual NAT syntax using the IP
32.8.2.66
nat (inside,outside) source dynamic INSIDE66 PDPAT-HOST45 destination static HOST45 HOST45

object network HOST-A
  nat (inside,outside) static 32.8.2.61

object network HOST-B
  nat (inside,outside) static 32.8.2.62

nat (inside,outside) after-auto source dynamic INSIDE66 DPAT-IP
Notice, the final Manual NAT statement includes the keyword after-auto. This is what “de-prioritizes” the statement, causing it to occur after the Auto NAT statements.
We can see the exact order in which NAT will occur using the show nat statement. Once again, since this output is from a lab device, the translate and untranslated hits will be 0, so those lines have been excluded:
asa98# show nat | exlude hits
Manual NAT Policies (Section 1)
1 (inside) to (outside) source dynamic INSIDE66 PDPAT-HOST45 destination static HOST45 HOST45

Auto NAT Policies (Section 2)
1 (inside) to (outside) source static HOST-A 32.8.2.61
2 (inside) to (outside) source static HOST-B 32.8.2.62

Manual NAT Policies (Section 3)
1 (inside) to (outside) source dynamic INSIDE66 DPAT-IP
With the output from the show nat command, we see very clearly the three sections. Section 1 included our Policy NAT applied with Manual NAT syntax. Section 2 included both our Static NAT statements applied with Auto NAT. Section 3 included any Manual NAT statement applied with the after-auto keyword.
Had we not used the after-auto keyword for our Dynamic PAT, it would have appeared in Section 1. If that was the case, the Dynamic PAT statement would have taken precedence over the Static NAT statements (in Section 2) and all traffic from Host A and Host B would be translated to 32.8.2.66, instead of their dedicated Static NAT IP addresses.
Using the after-auto keyword, however, allowed the generic Dynamic PAT statement to occur after Section 2, allowing Host A and B to use their dedicated Static NAT addresses. And Host C/D/E (etc… — not pictured) would use the generic Dynamic PAT statement in Section 3 to speak through the Firewall.
And of course, in all cases, the very specific Policy Dynamic PAT occurring in Section 1 will always take precedence over the other translations.
The example above describes the three sections of NAT precedence on Cisco ASA and Cisco ASA-X Firewalls. But within each Section there is also an order of NAT operations to consider.
NAT Precedence within the Manual NAT Sections
Both Section 1 and Section 3 include Manual NAT statements. The priority within either of these sections is determined by the order they appear in the configuration.
To help control this, each statement receives an incrementing line number automatically. Take a look at this example:
nat (inside,outside) source static AAA AAA destination static BBB BBB
nat (inside,outside) source static CCC CCC destination static DDD DDD
nat (inside,outside) source static EEE EEE destination static FFF FFF
When this configuration is applied (assuming the mock objects AAA–FFF have been created), we would see this in the show nat output:
asa98# show nat | exclude hits
Manual NAT Policies (Section 1)
1 (inside) to (outside) source static AAA AAA destination static BBB BBB
2 (inside) to (outside) source static CCC CCC destination static DDD DDD
3 (inside) to (outside) source static EEE EEE destination static FFF FFF
Notice, the first statement was placed at Line 1, the second at Line 2, and the third at Line 3 – they simply followed the order they were configured.
Had we used the after-auto keyword for each statement, they would have appeared as Lines 1, 2, and 3 of Section 3.
We can insert a Manual NAT statement at a specific line number by simply specifying the desired line number. The syntax is as follows:
nat (<REAL-INTF>,<MAPPED-INTF>) [after-auto] [Line Number] source ...
Notice the location of the optional [after-auto] keyword, and the [Line Number] occur directly after specifying the real and mapped interfaces in parenthesis. Once again, the line number denotes the NAT Precedence within either Section 1 or Section 3 – the two Manual NAT sections.
Using the line number, we can specify a particular Manual NAT statement to occur at Line 2:
nat (inside,outside) 2 source static GGG GGG destination static HHH HHH
We can verify the effect using show nat:
asa98(config)# show nat | exclude hits
Manual NAT Policies (Section 1)
1 (inside) to (outside) source static AAA AAA destination static BBB BBB
2 (inside) to (outside) source static GGG GGG destination static HHH HHH
3 (inside) to (outside) source static CCC CCC destination static DDD DDD
4 (inside) to (outside) source static EEE EEE destination static FFF FFF
The new line was inserted at line 2. And all the other Manual NAT statements simply shifted down: the original Line 2 became Line 3, and the original Line 3 became line 4.
NAT Precedence within the Auto NAT Section
NAT precedence within the Auto NAT section comes down to four rules. We will provide examples of each rule by configuring these five Auto NAT statements:
- A Dynamic PAT for the
10.9.9.0/24network to the IP72.9.9.24 - A Dynamic PAT for the
10.9.9.48/29network to the IP72.9.9.29 - A Static NAT for the Web Server at
10.9.9.80to72.9.9.80 - A Static NAT for the Database Server at
10.9.9.33to72.9.9.33 - A Static PAT for the Database Server so
10.9.9.33:22maps to72.9.9.33:2222
The configuration is applied with these commands, in this order:
object network INSIDE-24
  subnet 10.9.9.0 255.255.255.0
  nat (inside,outside) dynamic 72.9.9.24

object network INSIDE-29
  subnet 10.9.9.48 255.255.255.248
  nat (inside,outside) dynamic 72.9.9.29

object network WEB-SERVER
  host 10.9.9.80
  nat (inside,outside) static 72.9.9.80

object network DB-SERVER
  host 10.9.9.33
  nat (inside,outside) static 72.9.9.33

object network DB-SERVER-SSH
  host 10.9.9.33
  nat (inside,outside) static 72.9.9.33 service tcp 22 2222
Notice, these are all Auto NAT statements, which means they will all appear in Section 2. We will look at the output of the show nat detail command to see exactly what is being translated. And again we will exclude the lines which include all the translate hits and untranslated hits:
asa98# show nat detail | exclude hits
Auto NAT Policies (Section 2)
1 (inside) to (outside) source static DB-SERVER 72.9.9.33
 Source - Origin: 10.9.9.33/32, Translated: 72.9.9.33/32
2 (inside) to (outside) source static DB-SERVER-SSH 72.9.9.33 service tcp ssh 2222
 Source - Origin: 10.9.9.33/32, Translated: 72.9.9.33/32
 Service - Protocol: tcp Real: ssh Mapped: 2222
3 (inside) to (outside) source static WEB-SERVER 72.9.9.80
 Source - Origin: 10.9.9.80/32, Translated: 72.9.9.80/32
4 (inside) to (outside) source dynamic INSIDE-29 72.9.9.29
 Source - Origin: 10.9.9.48/29, Translated: 72.9.9.29/32
5 (inside) to (outside) source dynamic INSIDE-24 72.9.9.24
 Source - Origin: 10.9.9.0/24, Translated: 72.9.9.24/32
The first thing to notice is all three static translations (line 1,2,3) took higher priority than both dynamic translations (line 4 and 5). This brings us to the first rule of precedence within Auto NAT: Rule #1 is static translations always take higher priority than dynamic translations.
Next, if you look at the dynamic translations (line 4 and 5), the one translating the /29 network took higher priority than the one translating the /24 network. Which brings us to Rule #2, more specific translations take precedence over less specific translations (based on the Real IP). A /29 includes eight IP addresses and a /24 includes 256, which makes the /29 more specific.
All three static translations (line 1,2,3) specify a single Real IP, so they tie on Rule #2. What determines the order for these is simply the fact that the IP address 10.9.9.33 is numerically lower than 10.9.9.80. Rule #3 is that numerically lower Real IP take precedence over numerically higher Real IP.
And finally, take a look at line 1 and 2. Both of them are static translations, both of them have the same specificity (one IP), both of them have the same Real IP (10.9.9.33). Line 1 and 2 tie on all three rules we’ve covered so far.
The final rule, which will arbitrarily break any remaining ties is Rule #4, alphabetically based on object’s name. The name DB-SERVER is alphabetically before the name DB-SERVER-SSH – hence, the Static NAT is taking precedence over the Static PAT (which is typically undesirable – we’ll explore that in the next section).
So to summarize, the four rules for NAT Precedence within Section 2 – the Auto NAT section – are as follows:
- Static takes precedence over Dynamic
- Most Specific Real IP
- Numerically by Real IP
- Alphabetically by Object Name
Auto NAT Port Translations and NAT Precedence
If you look at the output from the example above, you will notice the Static NAT took precedence over the Static PAT.
This means if the Firewall receives a packet on the Outside interface destined to the IP address 72.9.9.33 and the TCP port 2222, it would be translated to the IP 10.9.9.33 and the port would remain TCP/2222. This is not ideal because we intended for traffic on port 2222 to be redirected internally to port 22.
Unfortunately, because of how Precedence works in Section 2, since both translations are static, and both specify a single address, and both translate the same Real IP, the only rule left which breaks ties is Rule #4: Alphabetically based on Object name.
To that end, it is a good idea to have a consistent structure for how you name your Static NAT and Static PAT statements using Auto NAT syntax to facilitate the PAT taking precedence over the NAT.
The Alphabetic priority is determined by the ASCII character codes. This means if you tend to name objects using words and numbers (A-Z, a-z, 0-9) that the following special characters alphabetically precede any letter or number: ! " # $ % & ' ( ) * + , - . / . Of these characters, the slash and the comma are not eligible for Object Names. This means any of the following will always precede any letters or words: ! " # $ % & ' ( ) * + - .
Applying that knowledge to the Auto NAT configuration above leads us to the following practical application of a Static PAT and a Static NAT:
object network DB-SERVER
  host 10.9.9.33
  nat (inside,outside) static 72.9.9.33

object network +DB-SERVER
  host 10.9.9.33
  nat (inside,outside) static 72.9.9.33 service tcp 22 2222
We can verify the NAT precedence using show nat:
asa98# show nat detail | exclude hits
Auto NAT Policies (Section 2)
1 (inside) to (outside) source static +DB-SERVER 72.9.9.33 service tcp ssh 2222
 Source - Origin: 10.9.9.33/32, Translated: 72.9.9.33/32
 Service - Protocol: tcp Real: ssh Mapped: 2222
2 (inside) to (outside) source static DB-SERVER 72.9.9.33
 Source - Origin: 10.9.9.33/32, Translated: 72.9.9.33/32
Notice, the Auto NAT rule within the object name +DB-SERVER took precedence over the AutoNAT rule within the object name DB-SERVER. This successfully prioritizes the Static PAT over the Static NAT within Section 2.
Identity NAT
Throughout this article we have had a few examples of Identity NAT but have not formally referred to them as such. This was intentional because the term Identity NAT sounds more complicated than it really is.
Identity NAT is nothing more than translating addresses to themselves. The end effect of which is essentially not translating certain traffic.
For example, when we provided a configuration example of a Policy NAT, we used the following syntax:
nat (inside,outside) source dynamic INSIDE66 PDPAT-HOST45 destination static HOST45 HOST45
Notice the Real Destination and the Mapped Destination used the same object name (HOST45). We were translating the object HOST45 to the object HOST45 – translating it to itself, i.e. not translating it. This was an example of an Identity NAT.
Specifically, we performed a Dynamic PAT on the source, and an Identity NAT on the destination.
The configuration of Identity NAT simply involves re-using an object as both the real object and the mapped object.
NAT Exemption on a Cisco ASA or Cisco ASA-X Firewall
Identity NAT is how you configure what is known as NAT Exemption – the concept of designating certain traffic to be exempt from address translation. Or said another way, designating certain traffic to not be translated.
For example, below is an ASA configured with a generic Dynamic PAT which translates the entire Seattle network (10.1.1.0/24) to the IP 72.3.3.77 when speaking to the Internet.
However, the ASA also has a VPN tunnel built to the Denver site. We want traffic from Seattle (10.1.1.0/24) to Denver (10.2.2.0/24) to be exempted from the generic Dynamic PAT so these two sites can speak to each other directly using private IP addresses.
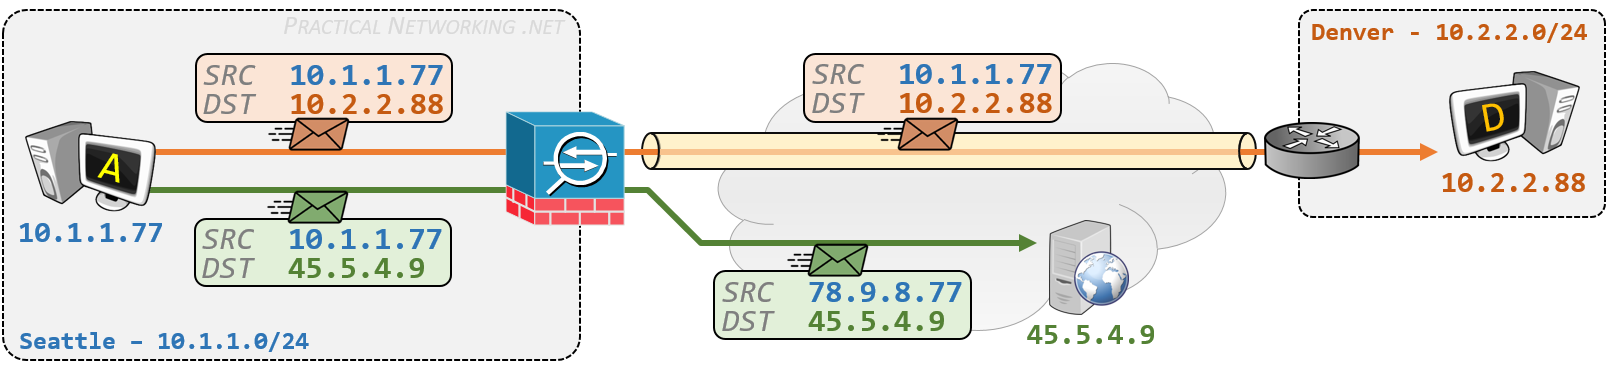
In such cases, you would configure a NAT Exemption on the ASA for traffic from 10.1.1.0/24 to 10.2.2.0/24. As mentioned before, the NAT Exemption configuration involves configuring an Identity NAT, i.e. translating traffic to itself:
object network SEATTLE
  subnet 10.1.1.0 255.255.255.0
  nat (inside,outside) dynamic 72.3.3.77

object network DENVER
  subnet 10.2.2.0 255.255.255.0

nat (inside,outside) source static SEATTLE SEATTLE destination static DENVER DENVER
With the configuration above, the Manual NAT statement would appear in Section 1 and take precedence over the Auto NAT statement which would appear in Section 2:
asa98# show nat detail | exclude hits
Manual NAT Policies (Section 1)
1 (inside) to (outside) source static SEATTLE SEATTLE destination static DENVER DENVER
 Source - Origin: 10.1.1.0/24, Translated: 10.1.1.0/24
 Destination - Origin: 10.2.2.0/24, Translated: 10.2.2.0/24

Auto NAT Policies (Section 2)
1 (inside) to (outside) source dynamic SEATTLE 72.3.3.77
 Source - Origin: 10.1.1.0/24, Translated: 72.3.3.77/32
Traffic from Seattle to Denver would match the Manual NAT statement and not be translated (Identity NAT), and traffic from Seattle to anywhere else on the Internet would match the Auto NAT statement and be translated using Dynamic PAT to 72.3.3.77.
Cisco ASA NAT – Summary
The Cisco ASA and Cisco ASA-X firewalls provides nearly infinite flexibility in so far as their NAT configuration. From the modularity of using objects, to the simplicity of configuring Auto NAT, to the granularity of Manual NAT, to the precision of NAT precedence — the ASA can do it all.
This article covers each of these concepts in detail, explaining what they mean, when to use them, and how to apply them. If you read it from start to finish, and were able to follow with the examples and illustrations, then you can decidedly consider yourself an address translation expert on the Cisco ASA platform.
 | Perhaps you would be interested in a video walkthrough of everything outlined in this guide? If so, I’ve published an online course covering Cisco ASA NAT. You can access the course here. Make sure to check out the Classes page to acquire the latest discount codes. |

")


Awesome explanation!!
Thank you so much.
You’re welcome. =)
Checkpoint and fortigate are so much more friendly to the admin with NAT config, at least their naming does exactly what it sound like
I’m sure its an exposure thing. I’ve gotten very used to the ASA’s configuration of NAT. Specially since 8.4.
But, if you like the way Checkpoint or Fortigate does it and/or names their iterations of NAT, please let me know what words they use and I’ll link them on the NAT Terminology Disambiguation page.
Thank you very much for your explanations. They help to understand everything in a very easy way. They are spectacular and, above all, very helpful.
Glad they helped, Sergio =)
What a fantastic guide. I know from CCNA 2, a few weeks ago, NAT is my weakest link. This will help, Thank you.
Glad you enjoyed it! Definitely check out the NAT article series if you are looking for a rundown on NAT as a technology (not tied to a specific vendor): pracnet.net/nat.
This is very helpful, thanks so much!
never seen such a great documentation before..Thanks a lot
Mate , you genuinely saved my life
Hi Karol. In that case, I’m really glad you found the article =)
Very well written article on NAT , thank you !
Some really terrific work on behjalf oof the owner of tthis site, deadd outstanding content.
This was exactly what I needed. Thank you so much for writing this! Using this new knowledge to set up my GNS3 lab.
Glad you enjoyed it, Jack =) Hope it helps with your GNS3 studies.
How would one generalize the Google DNS redirect example for any external DNS server? Does 0.0.0.0 act as a wildcard?
object network ANY-DNS
subnet 0.0.0.0 0.0.0.0
object (Inside,Outside) source dynamic All_Int_Nets DPAT-IP-DNS destination static Any_DNS CORP_DNS service UDP53 UDP53
Something like that? Thanks
Hello Ed Harmoush,
please can you also add a doc for the NAT with IPv6 ?
NAT64
NAT46
NAT66
NAT66 PAT
DNS64
ref.:
https://www.cisco.com/c/en/us/td/docs/security/asa/asa910/configuration/firewall/asa-910-firewall-config/nat-reference.html#concept_5FBE69B32F8E4A499276904DF6A2BB21
Without doubt this is the best guide on the web for using NAT on ASA’s. Many thanks.
Thanks for the very informative read through and your efforts are appreciated to untangle the various dubious NAT concepts.
I would like to request for a additional explanation of “route-lookup” attachment at the end of the NAT statement. Which is quite confusing and so far I have not found a very promising explanation.
Thanks once again!
Hi techkludge. I thought of adding
route-lookupbut its behavior has changed with different code versions. In order for this document to apply to as many code versions it could, I opted to leave those details out. Maybe it will become a future article. Who knows.Glad you enjoyed the article though =)
Thank you Ed for this very useful document that explains a lot.
I am not very clear only about the precedence if doable, when we use the same Static NAT on the source for Identity NAT on two different destinations
1. nat (inside,outside) source static INSIDE66 OUTSIDE66 destination static HOST45 HOST45
2. nat (inside,outside) source static INSIDE66 OUTSIDE66 destination static HOST55 HOST55
Thanks again!
Dear Ed,
thank you for your brief explan of NAT.
would you mind if add about CGN and how ipv6 works regarding with NAT ?
Still remain nice,
No doubt the best explanation of Cisco ASA post-8.3 NAT!
However, I have some doubts: in all examples and syntax highlights with regard to destination NAT, you stated something like
“… destination static “, but Cisco’s syntax (8.4, 9.x) says:
nat [ ( real_ifc , mapped_ifc ) ] [ line | { after-object [ line ]}] source static real_ob [ mapped_obj | interface ] [ destination static { mapped_obj | interface } real_obj ] [ service real_src_mapped_dest_svc_obj mapped_src_real_dest_svc_obj ] [ dns ] [ no-proxy-arp ] [ inactive ] [ description desc ]
This basically says that with destination NAT, first the MAPPED address is to be stated, and then the REAL, which is quite the opposite from the syntax given here. Perhaps I’m missing something?
Thanks
I second this. The Cisco documentation is a reverse of what you’ve stated here. Can you please clarify further on the destination side of things? Thank you
The previous comment did not render properly, so instead “… destination static “ should be:
“… destination static REAL-DST MAPPED-DST”
I guess that less than and greater than signs make page not display comment right way 🙂
I can’t thank you enough. I finally understand NAT properly.
Awesome…. Keep it up. Very much helpful
This is by far the best explanation I’ve ever read on ASAs. Not just the ASA, any posts on practicalnetworking.net are the best explanations I’ve ever read of networking concepts.
As they say, simplicity is the virtue of genius. Thank you, Ed! Please keep adding more and more to the website.
Very very good explanation I watched too many videos also raid too many blogs but not a crystal clear explanation like you. Good job. But Cisco nat is व complex than other Utm or network devices.
Hi Ed ,
Your blog is really helpful and has helped cleared a lot of doubts i previously had .I look forward to your articles and my only grievance is that you dont update in frquesntly enough 🙁
Ipsec topic says coming soon for a long time now , Still patiently waiting
hey everyone, thanks for the article it’s well explained and so informative.
For OUTBOUND traffic I tried to use a Manual NAT with static PAT, and I wanted to use the outside interface for mapping and I got an error:
i have created a network object with the same IP address of the outside interface
ERROR: Address 172.16.0.1 overlaps with outside interface address.
ERROR: NAT Policy is not downloaded
Other wise I must use another IP address or AUTO NAT if I want to use the IP address of the outside interface.
For inbound traffic: this is where things gets confusing to me
I tried this:
Object service DNS-DST
Service udp destination eq 53
Object service Telnet-DST
Service tcp destination eq 23
exit
Nat (outside,inside) source static Global-IP MULTI-SWITCH service Telnet-DST Telnet-DST
Nat (outside,inside) source static Global-IP DNS-server service DNS-DST DNS-DST
And it’s not working and I don’t know why ?
When I try the same approach using twice NAT for INBOUND traffic it works perfectly.
So from what I understand for OUTBOUND traffic we must use AUTO NAT (source only) or manual NAT.
For INBOUND TRAFFIC we must use TWICE NAT?
Correct me if am wrong
Very informative .
I should have got this information at the start of my career , would have helped me a lot to crack the interviews.
This is the best and most detailed ASA NAT explanation I have come across. Great job!
You are awesome!! Saved me loads of worry
Thanks heaps for this, very informative. Have you considered putting this tutorial into a .pdf file for printing, I would love to have a hard copy for reference. Cheers, Matt.
Thank you, Ed, for the very clear explanations!
Thank you – best explanation of NAT I have seen – most helpful
This just saved me thank you so much. Keep up the good work!!
This is the best explanation i have ever read for nat on ASA , it’s well organized , supported with examples with all possible show cli outputs commands and each section was fully clarified and explained in simple method , difference between each nat type also was mentioned , this article is too helpful , special thanks for this awsome article.
Great explanation!
Buddy i don’t have word to explain my feeling.This document helping me a lot.I wanna say thank you from the bottom of my heart.
If possible would you please share some more documents on Cisco ASA 8.4 and above version traffic flow & Failover etc.
Best NAT tutorial for ASA, thanks so much!
Wow! Best explanation of ASA NAT I’ve come across. Cisco Press should use this in their books. Thanks for taking the time to create this.
Thank you for the kind words, Sean. =)
I hardly comment online, but I got to say this is one of the best explanation for a technical subject ‘ve seen so far, your illustration was on point. Thanks
Thanks Benny, glad you enjoyed it =)
Best NAT tutorial, i ever seen. Great work!!!!
Best NAT resource on the Web, been to many sites… AWESOME!!
Thanks a bunch!
I have been configuring NAT for many years to date (OFF/ON – even transitioning to 8.3+ NAT) – and gets confused time after time without ASDM GUI interface (even sometimes with that too!). Your tutorial is simply THE BEST I have seen! It clarify everything about NAT I have been struggling with for years, even simply “reading” the statements meaningfully. Your human-readable method and examples given are superb! I can’t thank you enough for your (Practical Networking) many excellent tutorials. May you and your team be abundantly blessed! 🙂
Hi BigLad =) Thank you for the kind words. Glad you found this content useful =)
I usually do not comment on web pages, but you deserve to be thanked for the way you broke down NAT. There is so much useless information out there, but your page helped me to understand NAT totally. I will continue to use your site and if there is somewhere to donate to you for your hard work and effort please let me know.
Hi Mr. Robot =) I appreciate the kind words. I don’t have a mechanism in place for donations, so the best way to thank me for my efforts is to share the content on this blog across your social networks. Any additional exposure to this content is greatly appreciated! In the future, I’ll have printable PDF versions of a lot of these webpages that people can buy for a few dollars to show their support as Patrons of my content. Sign up for the newsletter to get updates on that.
Hello Ed, really good explanation appreciate your efforts,
I have concern, If i wan to have static nat for inbound connect and dynamic pat for outbound connection; can i achieve this.
If you want one IP address to have a Static NAT, and the rest of the IP addresses in a particular network to have Dynamic PAT, then yes. That is very possible.
If you want the same IP address Static NAT’ed inbound, and Dynamically PAT’ed outbound? Then no, that is not possible.
You could configure an additional IP address on the server, and have *that* IP being Static NAT’ed. Then the server’s primary IP could be Dynamic PAT’ed outbound. That would mimic what you are looking for. But you can’t have the same address translated different ways.
I guess, possibly you could if you make each of those methods translate differently based upon the IP address you are speaking with. Then it is simply a Policy NAT.
That’s Great explanation about NAT, I was searching the NAT topics and this is the best one.
Great Explanation so far ever on the internet on ASA NAT.
Thanks alot Ed,
I have got one more concern, can i NAT one public IP address to to different Private ip address for inbound connection with port forwarding.
Example:
10.1.1.2 (80,443) ======== 100.1.1.10
10.1.1.3 (1200,1300) ===== 100.1.1.10
Hi Owais. Yes. As long as only one translation exists for every combination of IP:Port. So, your example would work. =)
In fact, that is the exact example provided in the Static PAT section.
Hi Ed,
Thank you VERY much for this article and indeed all the content you have posted on this site.
As others have said already – it’s the best explanation of ASA OS NAT in a single article that I have yet seen on the Web, and I have been a ‘techie’ for over 25 years!
Simply excellent!
Hi Stewart =) Thank you for the kind words. I am flattered. I’m glad you enjoyed the article.
The best explanation on the internet I have found so far after an intensive research 🙂
Glad you liked it. Thank you for the kind words =)
Great presentation. Do these NAT commands also carry over to the Router syntax, or is that completely different??
I do agree with Al earlier, that Fortigate and even Palo Alto appear to have a more straight forward syntax when it comes to NAT cli. But I guess like you said its just a matter of getting used to it.
Excellent documentation, thanks for taking the time to do it.
Glad you enjoyed it. Yes, I think the platform you’re exposed to earlier ends up being the one you end up most comfortable with.
The Router syntax is very different. I’ve outlined the Cisco IOS Router commands in this article:
https://www.practicalnetworking.net/stand-alone/cisco-nat-configurations-ios-router/
I wish a Cisco documentation would be presented this way and live would be easier.
Good job! Thanks!
Dzony
I wish Cisco documents looked like this as well! Then I wouldn’t have to go through the trouble of writing these ;). Thanks for the kind words. Glad you enjoyed it.
Brilliant.. Well written and certainly easy to understand
Wowww…. Wonderful explanation in all types of NAT examples… Really useful for everyone…
Glad you enjoyed it, Maheshwaran =)